How to Create a Cost-Optimized Minecraft Server Using Google Cloud Platform
The Minecraft phenomena transcends both age and skill group, which means that extremely technical people have emerged to fill necessary community niches that the game needs. One of the main points of playing Minecraft is the ability to play in a session with other people. However, there is no official servers by Mojang, the developers of Minecraft, that host a simple session for a small group- with the exception of Minecraft Realms.
Unfortunately, the issue with Minecraft Realms is that it has a maximum playercount of ten people and offers extremely little control to the users, such as mod support. This is problematic to the longevity of a group’s interest in playing the game, as there is no easy way to spice up the gameplay. What third-party options do we have?
Third Party Options
Let’s take a look at our options. When we Google "minecraft server hosting", we are greeted with a few options such as Bisect Hosting, ScalaCube, and Apex Hosting. If we were to explore the possibility of renting a server from these retail owners, we learn that the costs of server hosting tends to be on the pricey end. Let’s look at Shockbyte’s plan.
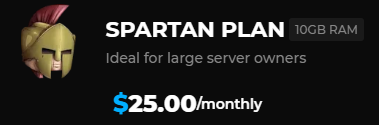
Ouch!
For a server that’s supposed to be ideal for ten players, setting back the user 25 dollars monthly is a pretty steep cost. On top of that, we aren’t even sure if they’re being honest about the specs or whatever they’re doing to reduce server costs. If we think about this critically, we realize that these retail owners are essentially middlemen between us and the server. Surely we can reduce costs by cutting them out of it.
Introduction Google Cloud Platform
There’s quite a few webserver hosters such as Amazon Web Services and Linodes. However, we will be using Google Cloud Platform for a few reasons. One of which is that it is cheaper overall, especially if one were to implement spot server features and use the free credits on sign-up. If you insist on using a different webserver hoster, then this tutorial is not for you because this is also a detailed guide for using Google Cloud Platform (which will now on be shortened to GCP). Additionally, anyone with an opinion regarding hosters most likely already have the technical know-how and will not need a guide on installing Minecraft.
Getting Started
There’s one only one critical prerequisite to this guide: a credit card, so be sure to have it on hand for the login process. We will start with the login, which can be found in their main website and can be found in a simple Google search.
It'll pretty much always be the first option.
The login process holds your hand well, and will not be explored in this tutorial. Upon completing account creation, you can access the console which can be found by clicking Console on the top left of the home page or typing console.cloud.google.com into your search bar. From here, let’s create a new project by clicking on the dropdown menu on the top left

and clicking the NEW PROJECT button on the top left of the menu. Pick a decent name (though Google will edit it to their specifications) and don’t worry about the organizations section. It’ll take a moment for Google to create a new project for you, so don’t worry if you cant access it immediately.
Navigating the Console
Google has a lot of tools available to you. The options highlighted in red are critical and will be explored later. The option highlighted in orange, however, is not necessary depending on the personal choice of the reader.
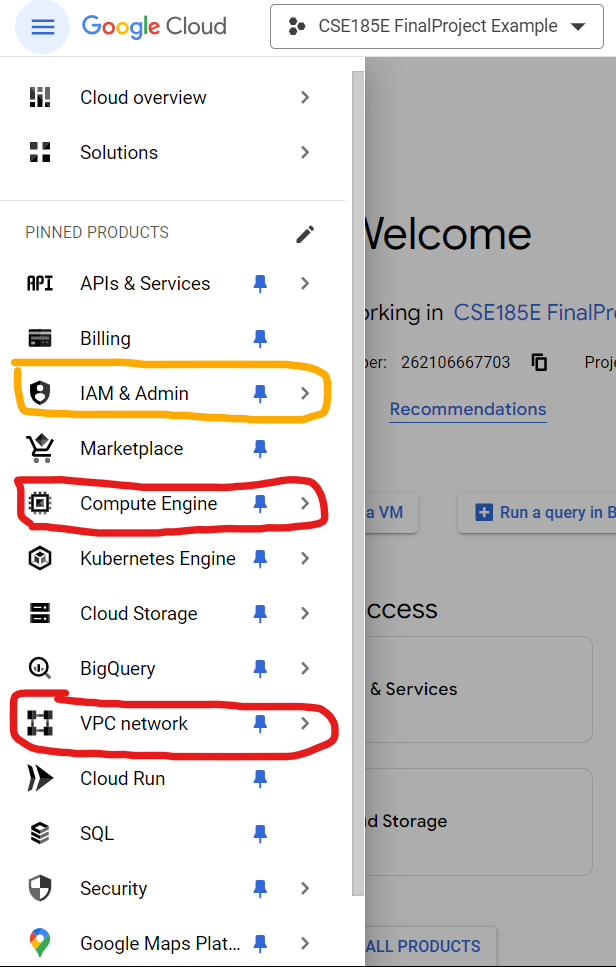
Let’s first take a visit to the Compute Engine section. If it’s your first time visiting it, be sure to enable its API.
Compute Engine
The Compute Engine is essentially where you handle the server, itself. This can range from creating "instances" to connecting to them via SSH and working with them. The vast majority of our efforts will be directed towards the resources that can be found here.
Creating a New Instance
Before we can play around in the real meat and potatoes of server hosting, we first need to create a new instance, which is done by clicking the blue CREATE INSTANCE button that can be found towards the top of the screen. The type of configuration you want is the E2 series, which is best suited for general personal use. Right below the Machine Configuration section and in the Machine Type one, select the Custom option. You should see these two sliders as a result.
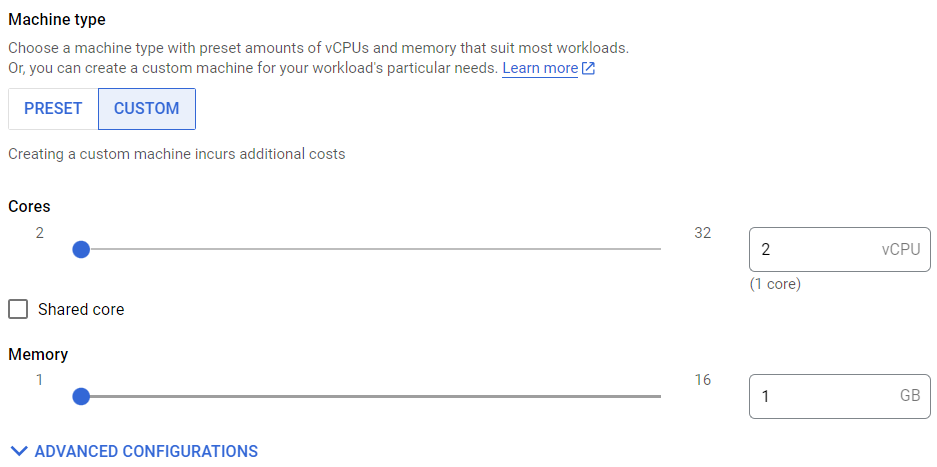
Unless you plan on hosting more than 30 players concurrently, 2 virtual CPU’s (vCPU’s) should be more than enough. However, minimum memory need is best described with this formula:
M = V + P * C
Where:
M - Memory - Is the total memory you’d need to allocate
V - Version Number - Represents the version number the Minecraft server will
run. The two possible values it has is either 4 or 2 gigabytes for versions after 1.12 or
1.12 and below respectively. There's more nuance with newer versions (as of May 2025) to which I invite you
to research yourself on how to further optimize memory use.
P - Player Count - The maximum amount players you expect to be on the server simultaneously.
C - Cost - Represents the memory cost that each player will incur. This can range
from 200 to 500 megabytes depending on how modded the server is from completely
vanilla to heavily modded
For example, a lightly modded 1.20 server that hosts around 5 players at a time will be around 5.5 gigabytes. However, it’s important to note that this is the minimum requirement to run the server. If you can afford to add more memory, then it’s highly advisable to do so. Fortunately, this is not a permanent decision and can be modified later.
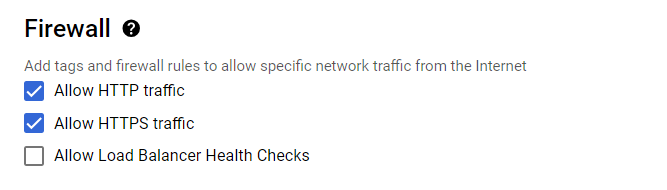
Next we shall look at the VM provisioning model and change the Standard type to Spot. This is to cut costs by 66%. The catch being that Google will on occasion shut off the server with a one minute warning in the operating system. Circumventing that will be explored later in the tutorial. For now, we should navigate to the Firewall section and have the Allow HTTP traffic and Allow HTTPs traffic boxes checked, as shown:
There are optional changes one can do to make their experience a little bit easier. For example, the user can change the name of their instance and location to no detriment to the rest of the project. When you’re satisfied, click on the blue CREATE button and Google will take a moment to set up that server for you.
Connecting to Your Server and Running Minecraft
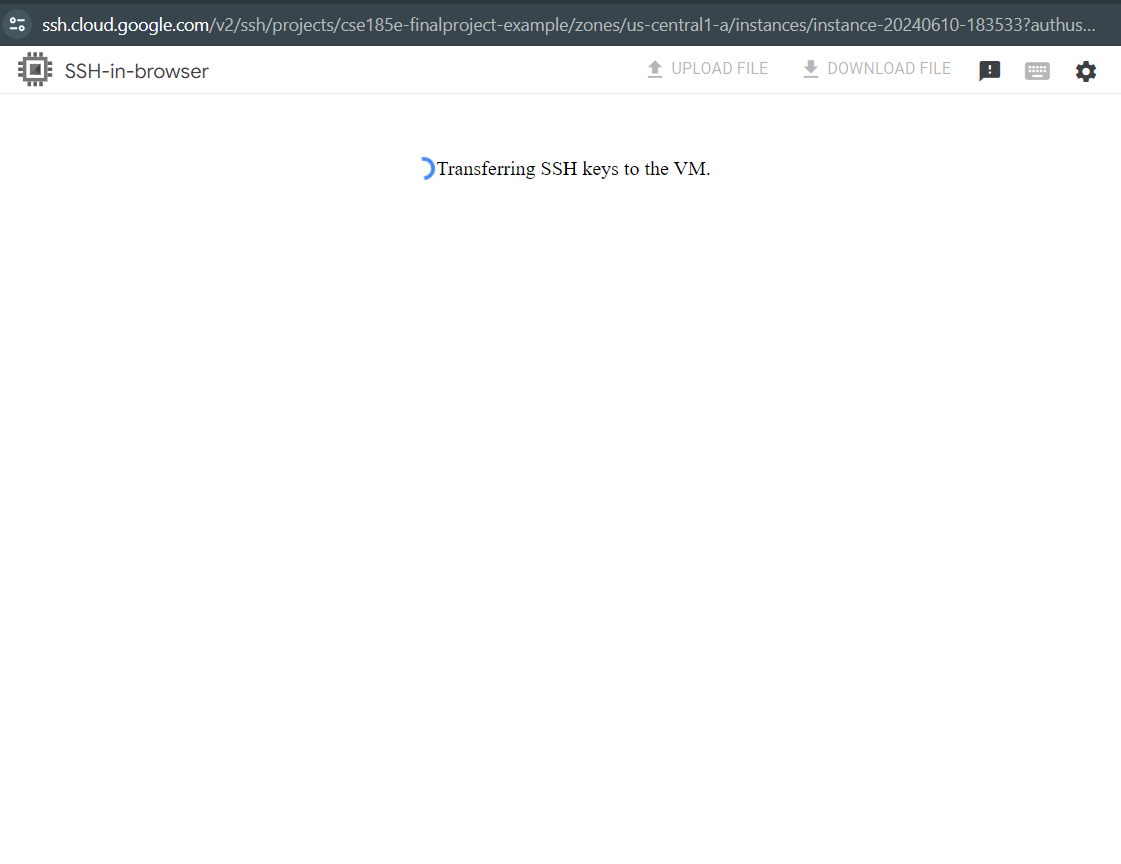
On the Compute Engine homepage, click on the instance, which should either have your custom name for it or a name similar to "instance-[numbers]-[numbers]" where [numbers] is a sequence of numbers. Afterwards, click on the SSH button, which will open a new window that looks like this:
and after a while, your should see this pop-up:
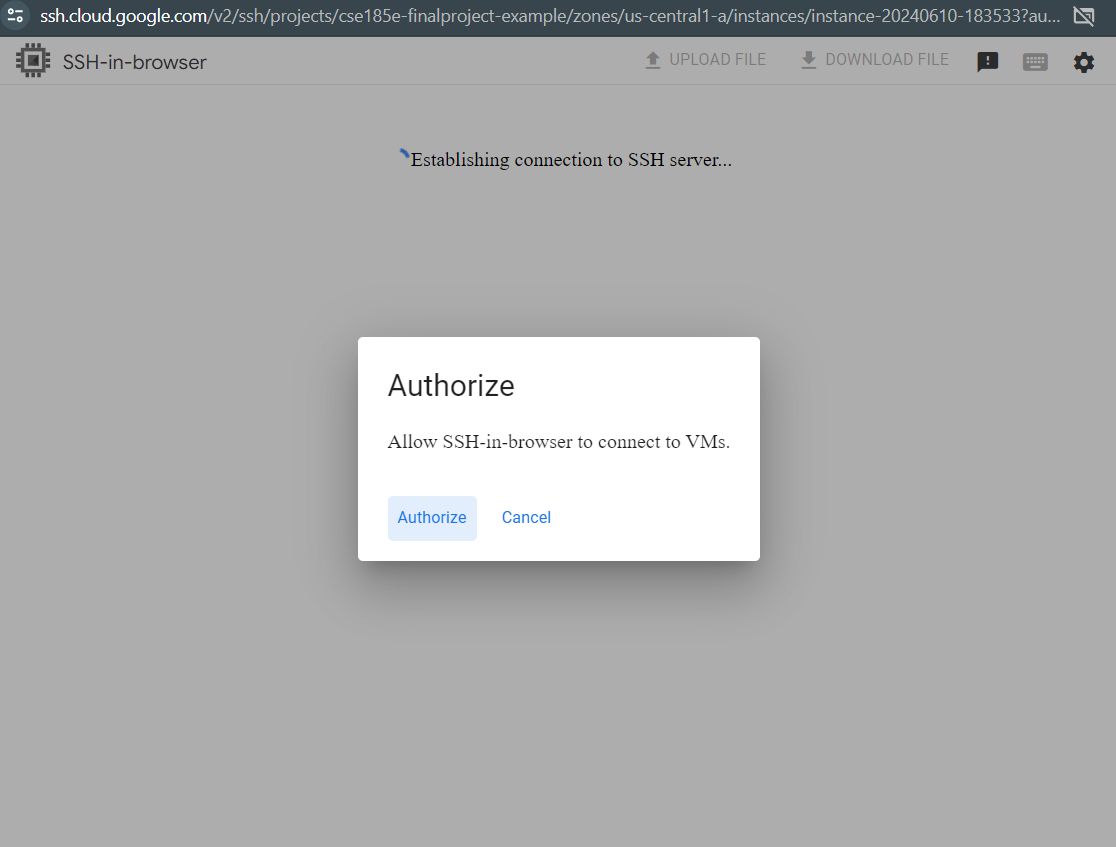
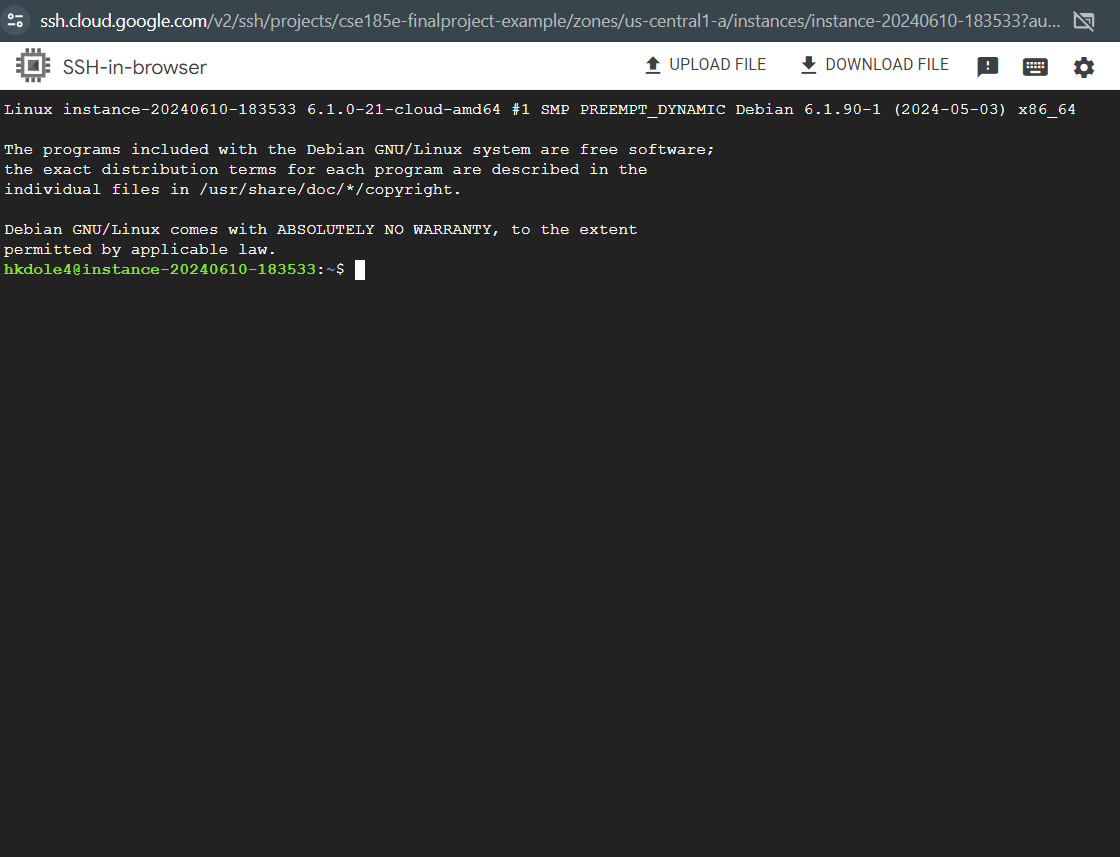
to which you should click Authorize. You will get another pop-up window which might ask you to login to your Google account, otherwise it’ll close itself shortly after. After a moment, you will be able to see the terminal of your server which will look like this:
since we are in a linux environment, it's important to review some important and basic Linux commands.
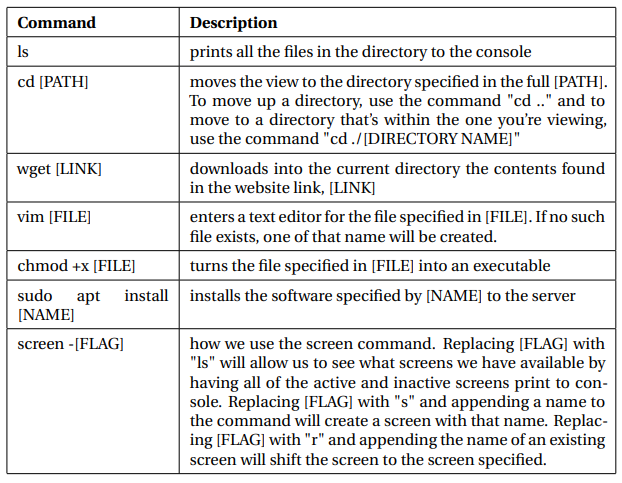
For the sake of simplicity, we shall use a download of the most recent version of vanilla Minecraft as an example (which as of writing is 1.20.6), however server files for mods can be found in websites like CuseForge. The most recent version of vanilla Minecraft can be found on the official website here. Though if you want past versions, you’ll need to find it through Google or archive.org. What you will need to do is get the link to the download which is by right-clicking the link and selecting "Copy link address". Afterwards, you should return to the terminal and type in "wget [LINK]" where [LINK] is what you’ve copied to your clipboard. It should look like this:

After hitting enter, your system should indicate that you’ve successfully downloaded it. Next, let’s make a simple script to start the server. We do this by using the VIM text editor through entering the command "vim start.sh". Your terminal should look vastly different and that’s okay! Press the ’i’ key on your keyboard to enter insert mode. Then type this in:
java −Xmx6G −jarserver.jar nogui
But you might have to modify this. One of which is the Xmx flag, where you might need to change "6G" to a different value depending on how much RAM your server has. For example if you have 8 gigabytes to allocate, you’d replace it with "8G" instead. If you want to specify the amount in terms of megabytes, you’d instead replace it with "8192M". When you finish writing, press the escape key and type ":wq" which will save the script and quit the text editor. We will then need to turn it into an executable which is done by typing "chmod +x start.sh". If you did that successfully, you should see that the file is a green color when you use the "ls" command.

Before we can run the command, we will need to install the right version of Java to the server, which is done by typing the command (without the quotation marks)
"wget https://download.oracle.com/java/21/latest/jdk-21_linux-x64_bin.deb"
followed by
"sudo dpkg -i jdk-21_linux-x64_bin.deb".
It will take a while to load and will require you to enter "Y" into the console to continue the download. After it installs, you can run the command by typing "./start.sh" into the console. The start-up should fail, which is completely expected because we need to sign the EULA. This is done by typing "vim eula.txt" into the console, pressing ’i’ to edit text, and replace "false" with "true". The text file should look like this before you press "escape" and entering ":wq":

At this point, you should be able to start the Minecraft server at any time, but it’s not easily accessible to players yet. This is where we have to look at the Networking aspect of GCP.
VPC Networks
Our server doesn’t have a persistent external IP address. This basically means that every time the server turns off, it will have a new external IP address. For some uses, this doesn’t matter but it makes it difficult for users to connect to the Minecraft server and will need to be updated on the change every time it happens. We’ll need to arrange for a persistent IP address and make sure that data received through that address actually goes through.
Changing Firewall Rules
We need to first navigate to the VPC network tab. From there, we will need to click on the Firewall tab. In the top middle of the screen, click on the "Create Firewall Rule" button. For these options add or modify the input specifications:

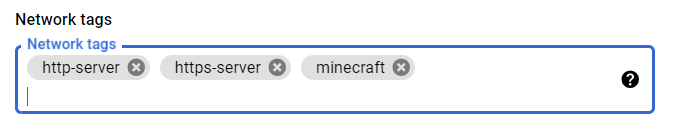
Once finished with the details of the firewall, you can save it. Afterwards, we will need to make a quick visit to our Compute Engine instance, by going to the Compute Engine tab and selecting our instance. Before we can edit the instance, we will need to stop it by clicking on the three dots right next to the "OPERATIONS" button on the top left and selecting the stop option. When the instance finally stops, we can edit the instance by clicking on the "EDIT" button in the top middle of the page. Scroll down the page until you reach the "Network tags" option and add the "minecraft" tag like so:
Reserving a Static External IP Address
When you return to the VPC network homepage, click on the "IP addresses" tab on the left. Now, click on the "RESERVE EXTERNAL STATIC IP ADDRESS" button. You should insert your options similarly to the image shown here:
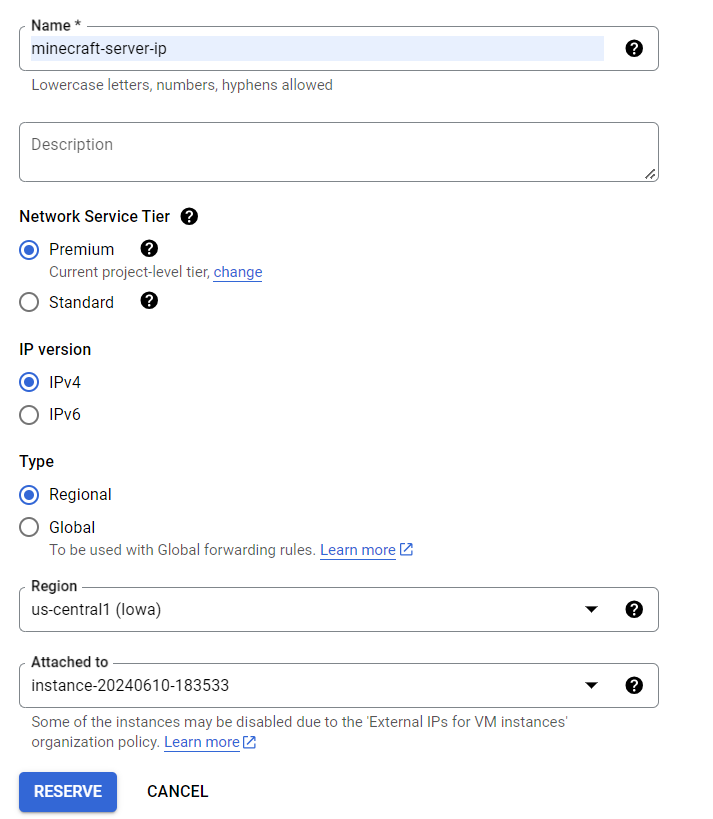
You might need to change the region to fit your local region accordingly and make sure that the "Attached to" option refers to the instance you are running Minecraft on. Once you’re sure, click on the blue "RESERVE" button. Your server now has a static IP address! Now you’ll be able to use the IP address, displayed in the details of the instance, to connect to the Minecraft server!
Handling Server Shutdowns
Due to the nature of spot servers shutting down every so often, we will need to figure out an easy way to run the start script and have the users be able to turn on the server (this part can be skipped if you don’t mind manually turning on the server every time). First, however we need to create a startup script. This is done by going to the instance in the Compute Engine and scrolling down to the "automation" text box. In there, type:
cd [PATH]
screen -dmS minecraftScreen ./start.sh
But replace PATH with the absolute path to the directory that the startup script is. This can be found by typing the "pwd" command in the instance’s terminal. Now that we’ve handled this, let’s explore our two options regarding allowing users to start up the server without your help: IAM Roles and setting up a Discord bot as a user interface
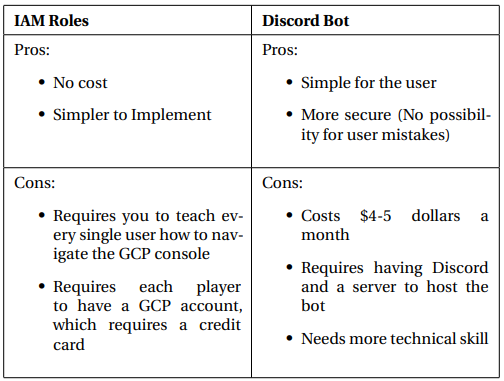
Either one of these options is a perfectly valid way to handle server startup, though having both would be redundant and as such only implementing one is recommended. I personally prefer and use the Discord Bot option as I consider it the most fun, but if you want the simplest time, the IAM Roles is the easiest route.
IAM Roles
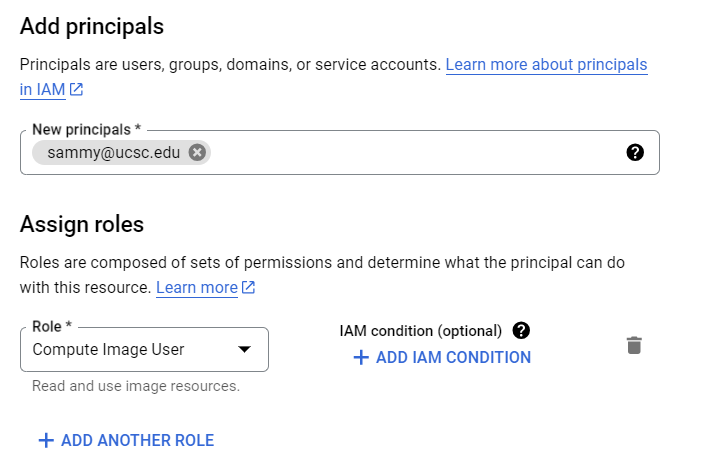
IAM Roles are essentially ways for people that aren’t you, the root, to use and interact with the project. This is done by providing them permissions. We will first need to navigate to the "IAM & Admin" tab, which was highlighted in orange in an earlier section. Afterwards, click on the "Grant Access" button. In the "New principals" box, type in the emails of everyone that will be participating in the server. Now let’s assign roles by clicking the "Select a role" box and typing "compute image user" into the search bar. You should see this if you did everything correctly:
When you’re done, hit save and inform everyone invited to visit Google Cloud Platform’s console. From there, teach everyone else how to turn on the server using the Compute Instance tab.
Discord Bot
This is explained more in depth in the next article. Feel free to check out my Github Repository for the code involved.
Cost-Optimization
There are a few more ways to save money. Some examples of which is setting up a python script in conjunction with crontab to check for inactivity. If the server has no players on it, it’ll automatically shut down. There’s also a particularly humorous way to circumvent costs, which involves Google’s free trial. This is done by rotating the sign-ups of members of the server in order to maximize the amount of time that the server is under a free membership. However, this requires that people have not signed up already. Theoretically, there is a way to automate server resource allocation through Google’s API and an outside instance, but I have yet to research that avenue
Alternatives
A pretty common way to host a server is by doing it with a local, personal computer. This is a valid option, though it will require its constant maintenance which can be problematic in a potential emergency situation. What stopped me from doing that, myself is the network costs of having a static external IP address. Apparently Comcast charges a ludicrous $50 a month (damn you ISP monopolies.) Though I’ve heard that people use VPN and port-forwarding which might be a potential avenue to explore and further cut costs.
Conclusion
Hopefully that you found this tutorial useful. Even though the advertised use is for the creation of Minecraft servers, this also serves as an excellent excuse to not only explore Google Cloud Platform, but other webhosters. Going through the Discord Bot avenue, for example, allows you to explore Amazon’s own hosting service (which is better in my opinion, but more expensive). Of course, there are so many more webservices out there and the most cost efficient one has yet to be found. Though the one that has the most tools is probably Amazon’s. Good luck and happy mining and programming!